Mixed Media Artist

I work primarily in acrylics and collage.I use collage and beewax in my assemblage works and am now completing several shrines using found objects. I have been experimenting with encaustic collage and have found the medium very challenging. The paint is a combination of melted beeswax and pigment. A small amount of damar resin is added for hardness. I mix these paints myself and while painting all custom colors are mixed directly on a hot palette.
I will share my progress with this exciting medium with photos of work in progress and finished pieces.

Monday, April 27, 2020

Recycle and use an altered book as a journal

Altered books make very cool journals because they eliminate that fear of the blank page, or "spoiling" a new journal.


I painted the cover with light blue acrylic paint. Milk paint or chalk paint also distresses nicely. I let it dry over night and sanded it lightly with a green scotch bright pad. 

I didn't have to prepare the original surface because it was book cloth and absorbed the paint readily.

Now is the time to remove some of the pages. Randomly tear out sections until you are left with a good amount left in the book. I then took a ruler and carefully tore the remaining pages leaving a small edge about 2 inches. These are what you are going to add your artwork and collage to. Use a good quality paper glue (such as PVA) Be creative and use different weights and types of paper.


Here are some examples of what the pages look like. As you can see this journal is ready and waiting for me to begin.


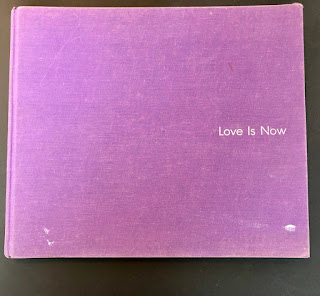
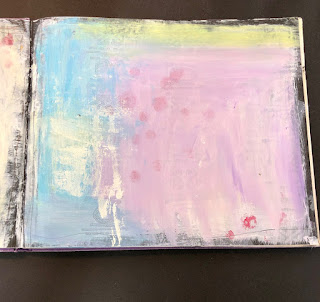
Here is another way to transform a book into a journal. I liked the large format of this coffee table book. I decided to leave the pages intact, they were a good size and weight. So I removed first and last signatures and prepared the pages with gesso.


Oh, the possibilities......


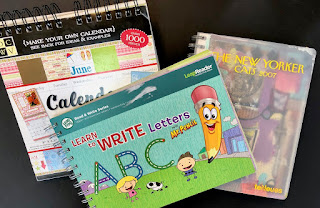
Children's book or board  books


Reader's Digest Condensed Books

Use your imagination, you'd be surprised with how many everyday things you can turn into a journal. Good Luck!

Don't forget to follow me on instagram stories @lynncorsibland for the #stayathome journal challenge that starts on May 1st.



Friday, April 24, 2020

LET'S TAKE A RISK AND START AN ART JOURNAL NOW!


"Better to do something imperfectly than to do nothing flawlessly."
Robert Schuller


Grab your books and let's get inspired.......


Supplies you will need before you begin:

journal or altered book
paint, can be any that you like working with, watercolor, watercolor pencils, pens, or inexpensive craft paint
gesso, this is a white, flat paint that dries with a rough finish, makes a great ground for pages. Pastel or white craft paint works as well.
scissors
brushes
pens or pencils
matte medium or glue stick for adhering papers
variety of thin collage papers: these can be from magazines, junk mail, old book pages, painted papers, etc.


Here are a few recent journal pages as examples.


This is a minimalist page with paint and very little collage, without text


These pages are just some doodles with a fine line micron pen. It's a great to get you warmed up and get your right brain in gear.


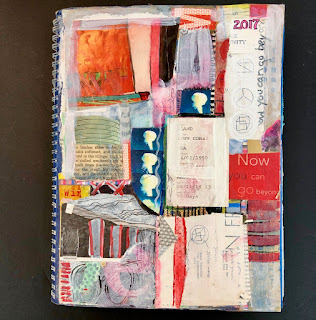
A page with collage and paint
Art journaling can help us to express our emotions, or be about something that is troubling us.


This page is strictly collage and I added the word art and the stripes with a marker.


Don't forget to follow me on instagram @lynncorsibland for the #stayathome Journal Challenge, May 1st in my stories.


Saturday, April 11, 2020

#STAYING HOME

What a crazy time we are living in today! I felt this would be a great time to connect with all of you, since we are spending time at home, with no idea when we will be able to see the light up ahead.

As an artist I am enjoying spending more time making art. Art can be a solitary practice, so I am pretty good at social distancing. I do miss time with friends, and family. It is important for all of us
to be serious and stay away from others for the common good.

I enjoy working in my sketchbook or journal every day, and have been doing this for the last 16 years.  I never kept a diary or journal growing up but loved to make art. So when introduced to Art journaling I had found a perfect match. The beauty of this is anything goes because it it for just you!
If you feel the need to write a few words, thats great, if not, paint, draw, scribble, anything that motivates you. After keeping an art journal for a while it becomes habit, and looking at completed ones you have done will show your progress in art and life.

I would like to motivate you to start one in the coming weeks. I will be posting photos and prompts to help you get inspired. I will be sharing lots of journal pages on my instagram feed and hope you will follow along with me. @lynncorsibland.


First step is to find a physical journal. They are available in all sizes. There are many out there to purchase online and delivery is right to your door. Altered books, old day planners, and handmade books make great ones. The only prerequisite is sturdy pages that can take mixed media. Thin sketchbook paper does not hold up. I prefer a spray bound book but it is up to you.


Here are some ideas using old books and calendars to alter. I always check thrift stores for children's
books, especially board books because the pages are nice and thick.


Coffee table books also make good  altered journals. I haven't done the cover yet. this next photo shows a gessoed page ready to work on.


This one is an old do it yourself book from Goodwill. I liked the size, the pages were a little thin so I glued two of them together to use.


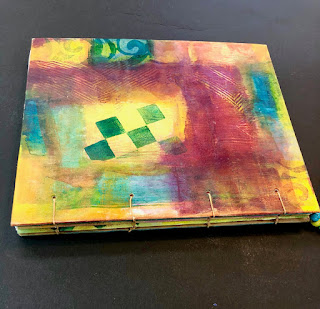
Below is a journal made from cereal box cardboard bound with a simple coptic stitch.


Don't forget to follow me on instagram. @lynncorsibland for my journal challenge and journal pages.


Friday, May 5, 2017

News on the Encaustic Front

I am happy to say the little painting that was shown on the last post won an award of merit.

Arrowmont School of Arts and Crafts has a prestigious show biennially in the main gallery of the school. It is only open to Sevier County Residents and has gained popularity through the years.
This year's juror was Ms. Teri Alea. She is the Executive Director for Tennessee Craft, a leading statewide craft organization which provides professional development for craft artists across the state.

I entered "The Jester" and received one of three of the merit awards. It was exciting for me to be recognized in my own community for my artwork. Here I am with my painting.


The "Jester" is offered for sale.
Please visit my etsy store: 


Please visit my etsy store: 

Monday, October 24, 2016

Encaustic continued

 The crashing of my computer and the crashing of the waves from hurricane Matthew delayed me a bit, but I am back and ready to start painting.


At this point I have decided to change the orientation. So I flip it upside down and like it better this way.


I am trying out this strip of black and white paper as a possible collage element. I add surface interest by scratching and drawing.


I am still trying this strip of black and white paper, this is a longer piece Now to add more color. I mixed this beautiful shade of coral and love the way it looks with the blue.

Notice the small black dots in the upper right These dots are made with an electric encaustic stylus. It is a wonderful tool for drawing fine precise line. It has a caligraphy nib and draws up the hot wax.
At this point I'm removing the strip of black and white and have decided not to use it.


In the detail below, I have added a rubbing of carbon paper over the blue square to tone the brightness
down. I add some drawing with a china pencil and small dots with an encaustic stylus.


The yellow lines are made by painting over the yellow and then digging into the surface to show the color underneath. This is why so many layers are built up.


This grid is drawn on with carbon paper.


To finish I have added a few more color layers, and I scrape the surface as I go with a single edge razor blade. This makes the surface flat. I collage strip of my hand painted paper as a finishing touch.
This is a 12" by 12"encaustic painting on a cradled board and it is for sale in my etsy store. Please visit:  notsobland.etsy.com  


SaveSave

Monday, September 5, 2016

Part 2 of my process

The first layer of color is now applied, and I am laying out my composition.  I work in geometric blocks of color for this layer mainly to try color combinations and see how they work with each other. 
I vary the sizes and intensity of the blocks.


I


The indian yellow has been mixed with a 50/50 portion of encaustic medium to make a transparent glaze. I wanted to keep the marks on the underpainting. The gray portions are left opaque.
There aren't many ways to mark on the wax but I have found that india ink can be used if its applied thick enough. The  marks in the middle section are made with ink. I also have a hot stylus tool that uses encaustic paint and the small dots in the lower right are made with this tool.


detail of the india ink on the wax surface


I add more blocks of color to the composition. Some of the underpainting is being hidden. I painted a brighter blue over the large navy block and let some of the dark underneath show through. I am now working with all opaque colors. I have taken a sharp tool and scratched through the surface in some places to let the layers come through.


I will let this "rest" until I decide what comes next. My paintings can consist of 10 layers or more.
I really love the way the colors can be made transparent so they change slightly when layered over another. I could add some collage at this point or add a layer of clear medium. I will add the clear over marks that I want to keep so they don't float during fusing. Every time a new layer is applied the torch or heatgun is used to adhere the new layer to the old ones.

Wednesday, August 3, 2016

A Look at my process

I have recently become a fan of instagram. So many visual treats to excite the senses. I am hooked and hope you will follow me. My handle is just my name, all three of them: lynncorsibland

After posting a few photos of my process when creating an encaustic painting I got a great response, so I thought I'd try it here on my blog.

I thought it might be interesting to document each step as I build up the layers of an encaustic painting.
One painting can have as many as 20, with others only 10 to 12. The first layer is always the gesso and I like to cover my boards myself. If I'm in a mood to work textured I can easily create a few bumps and dips to make it suit me.
The gesso is a very special porous one made specifically for painting with encaustic medium. The surface must be very porous to absorb the wax. Acrylic gesso WILL NOT work. It has a polymer base which is plastic and works as a sealer. I order mine from RFPaints. Some artists paint directly on the raw wood, this works well, and saves a step, but I like the bright white surface.

Here is my board with 2 layers of gesso, and one of india ink loosely painted with a small brush.


I always break up my surface with some type of marks. I get ideas and inspiration as I look at the marks I've drawn.

The next two layers are clear encaustic medium with no pigments added. Even if I want a textured piece I scrape the surface with a razor blade on these early layers. I now have 4 layers and haven't really begun to paint.


I don't plan my colors at the beginning. I like to intuitively look at those lovely colors of hot
wax and randomly choose. These first few layers will covered over so any colors will do. It's
a nice surprise sometimes as I'm scraping through layers to find a wild color combo that I
just love. This is the beauty of the encaustic process.  After a few more colorful layers it's time
to get serious. I move the colors that I plan to use and put them to one side of my palette.


I really like the way this blue and coral look side by side on my palette. So these will be a good starting point. I'll continue my demo on the next blog post.